Monday, February 8, 2010

My Bike Fit and Wind Tunnel Testing

I spent the morning in the A2 Wind Tunnel in Mooresville, North Carolina doing one-minute intervals into a 30-mph headwind to get my new Blue Triad SL dialed in for this next season’s racing. While I had taken clients to wind tunnels before, this my first opportunity to get my own time trial bike and position tested.

I’ve had many bike fits done and highly recommend that as a necessity regardless of whether or not your next step will be a wind tunnel. A bike fit will cost you from $100 to $300 depending on how much time it takes and the reputation of the fitter. I found the A2 tunnel to be rather inexpensive as wind tunnels go. I’m used to having my clients pay up to $800 per hour. A2 charges _only_ $390 for an hour. I spent the better part of two hours on the saddle in the tunnel. And that’s about how much time my clients have also needed. That’s still a fair chunk of change so you want to come away with positive results. “Buying” a minute for a 40k is very expensive.

Again, I recommend that everyone has a bike fit done by a professional fitter. I go to a lot of races and see horrible bike positions that reduce power and increase drag – the worst possible combination. With a few small adjustments I could do wonders for nearly all of these riders (the others need bikes that fit – you can’t do much to correct that). It would take hours of weekly training for several months to build more power in order to reap the same benefit as a few basic adjustments of the bike set up would take.

So here’s what led me to Mooresville… After the new Blue TT bike was built up I met with Chris Pulleyn at Bicycle Ranch in Scottsdale, Arizona for a fit. Chris has done this for every athlete I’ve coached for the past three years. He is meticulous and determined to get an excellent position. Accompanying is a picture of Chris setting the position right at the end of the fit. I liked the position we came up with and felt both powerful and aerodynamic.

But there is a big difference between pedaling easily in a fit studio and racing on the road. The wind tunnel showed me that. On the first of 15 runs (a “run” lasts about 90 seconds and includes about 30 seconds of both the rider and the fans coming up to speed followed by about a minute at functional threshold power while readings are captured) I felt a little high. Fourteen runs later we had the bike set for a position that fit my needs – which is mostly 20km time trials. Had I been training for a longer event, especially something like an Ironman triathlon, the position would have been altogether different. The biggest change is that we would have shifted the focus from aggressively aerodynamic toward being far more comfortable.


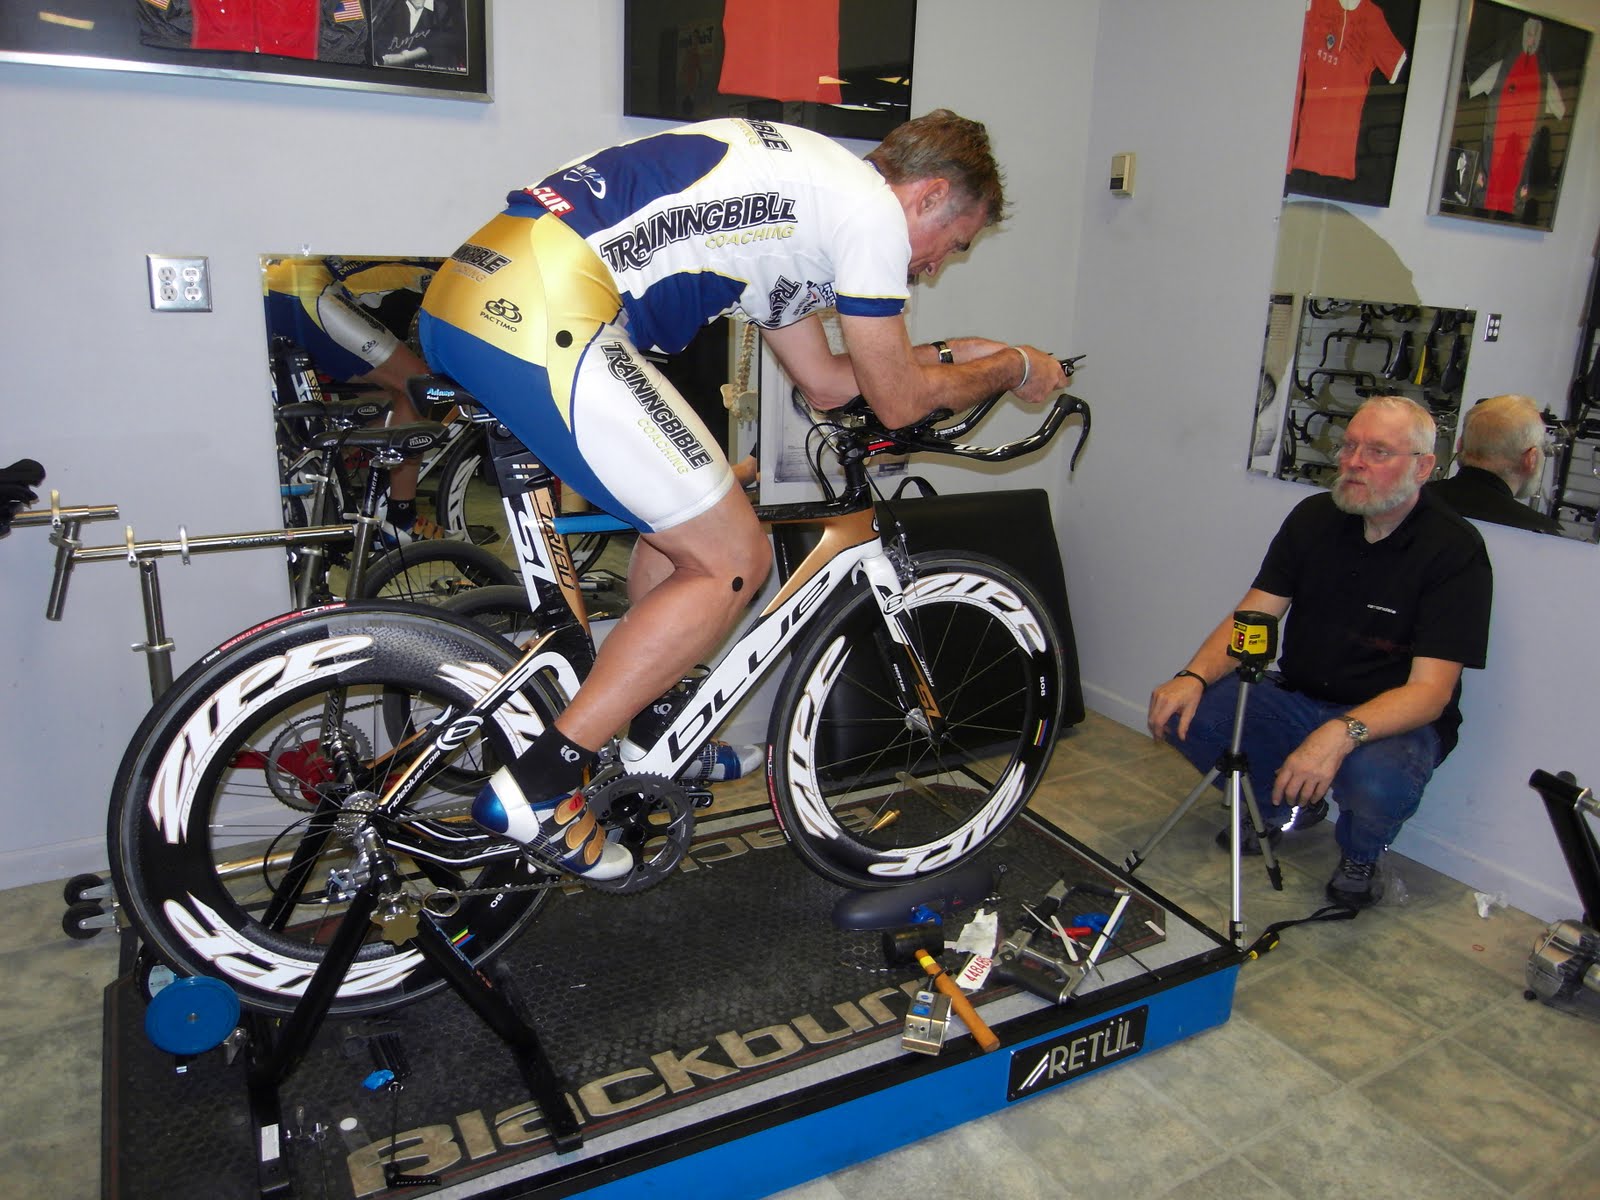
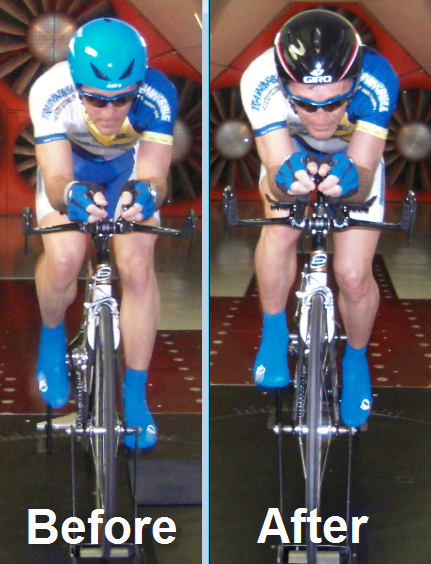
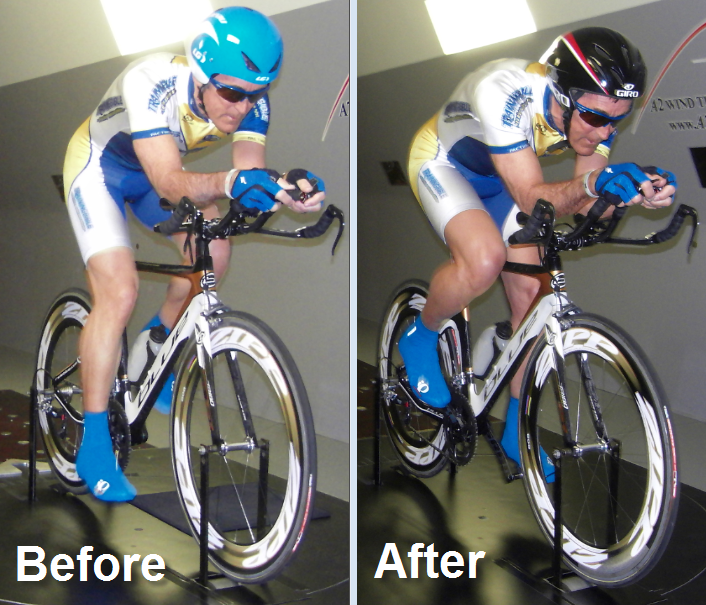
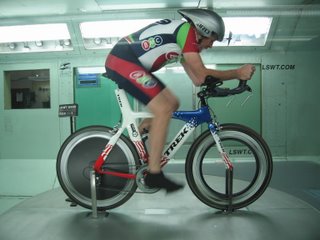
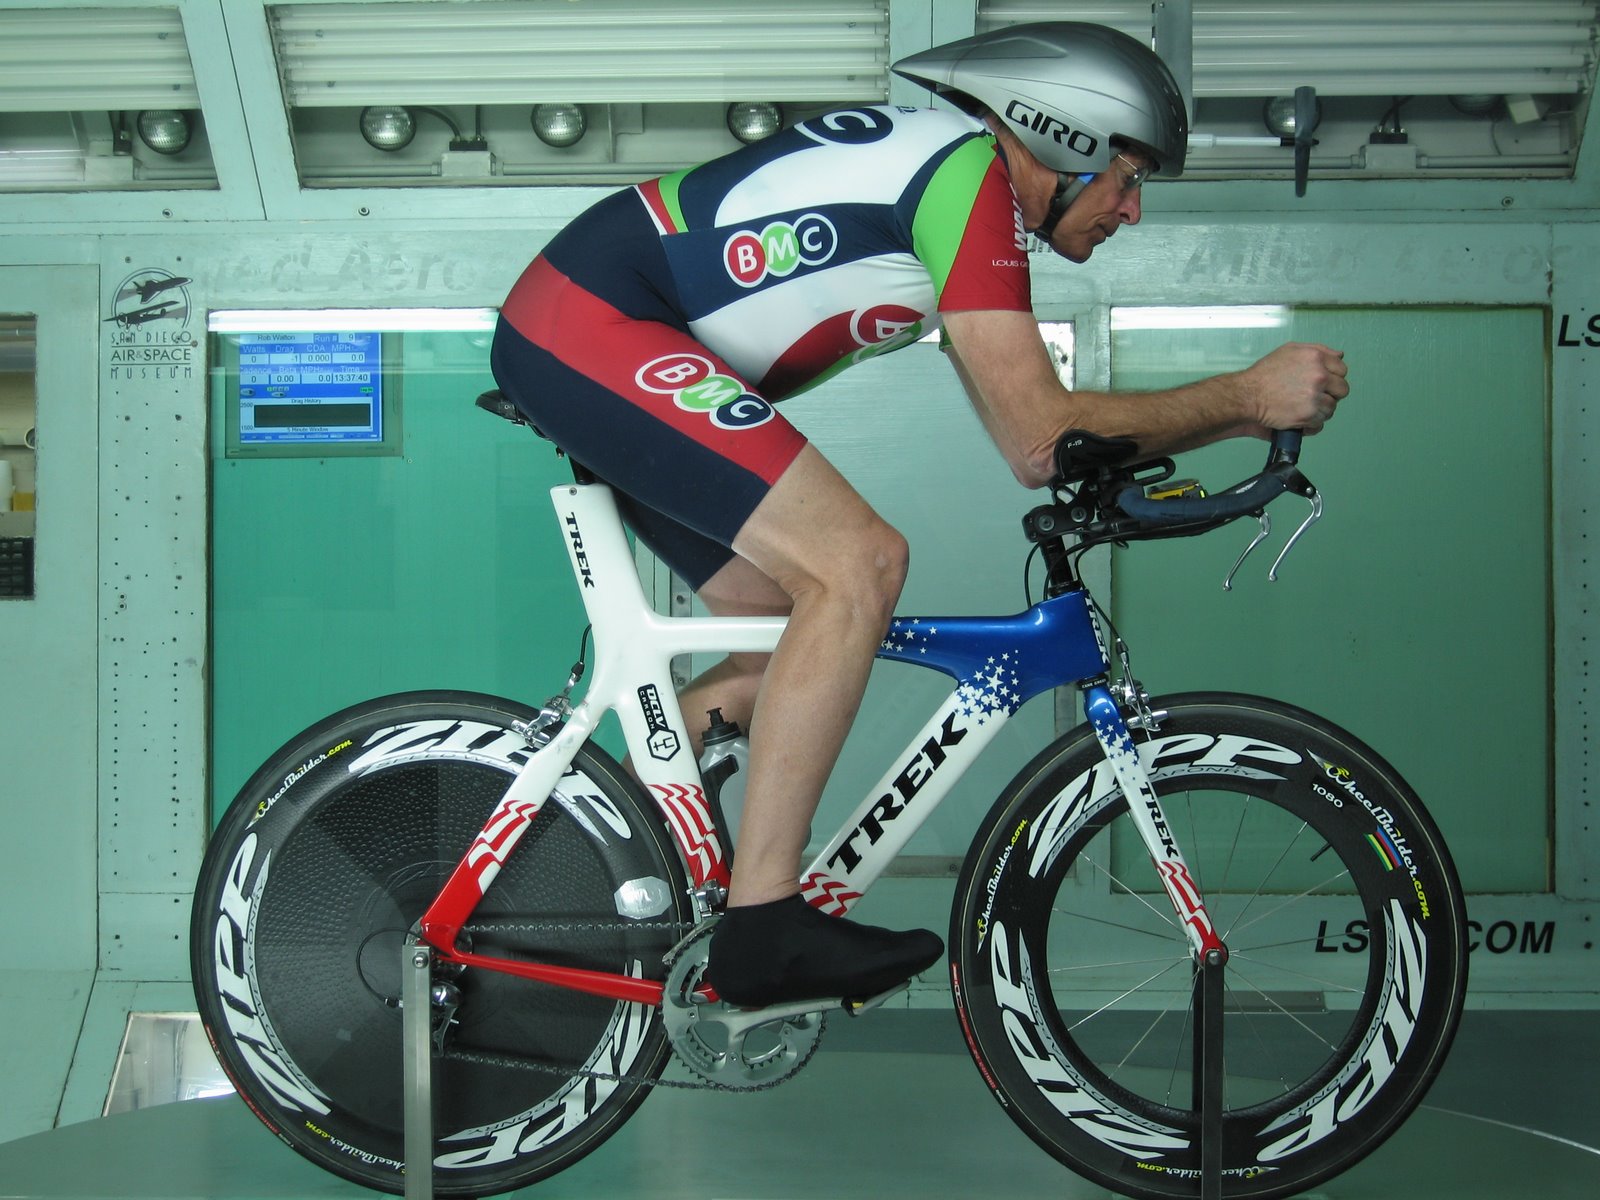
The before-after pictures you see here show fairly well the changes that Mike Giraud at A2 made in my position. He started by lowering the handlebars. This was done four times for a total drop of 4.5cm. Each time I became a bit more aero, but power dropped off a bit also. By the fourth time the trade off wasn’t good and so he brought the bars back up 5mm. Then he began bringing the elbows in, about 3cm at a time for three tries. The last was too much and so I ended up with the elbow pads 3cm narrower than when we started. This made for a bit too much discomfort in trying t hold on to the S-bend aerobars and so he rotate them I so that the bar ends nearly touched.

After a try at making my shoulders narrower by lifting them toward my ears, which didn’t achieve very much, he tried a different helmet. My Garneau Rocket Air helmet (blue in pictures) was replaced by a Giro Advantage 2 (black in pictures). The Giro helmet fit a bit closer to my back and also seemed better shaped for my head. I also liked the heavily padded ear covers, which quieted the 30mph wind. (Interestingly, this latter is suggested by John Cobb to reduce the sound of the air thus reducing one’s perceived exertion. Only he achieves it by using ear plugs.)

The bottom line is that I wound up with my bars 4cm lower, my elbows 3cm narrower, my hands brought together by rotating the bar extensions, and different helmet. The power and drag numbers are not available as I write this. I will post them at another time.

I’m now ready to race – except for the fitness part.

Labels: ,

Sunday, February 22, 2009

Wind Tunnel Visit

On Thursday Chris Pulleyn, Jim Vance and I went to the San Diego Low Speed Wind Tunnel with one of the cyclists I coach to fine tune his time trial position. Chris is the bike fitter from Bicycle Ranch in Scottsdale, Ariz., I have worked with for the last several years. He has set the bikes for nearly every athlete I’ve coached since 2005. At least I think it was 2005 when we started working together. Regardless, it has been many years. Chris is thorough to a fault and always focused on perfection whether the rider is a novice or pro.

Dave Sanford met us at the front door of the tunnel and, as always, gave us a historical tour of the facility. It’s always an impressive sight seeing those big propeller blades. It’s called the “Low Speed” tunnel because the top end for the facility is a 275 miles per hour wind. That’s appropriate for airplanes and Cruise missiles but we would be operating at 25mph.

After the tour we set about getting the bike ready. Chris had already done a two-hour fit on it back in January. We were here now just to make small tweaks to the set up. I’ve found Chris’ fittings to be quite close when it comes to aerodynamics. So I knew we would only make small changes. That’s exactly how it turned out.

The first order of business involved installing an adjustable stem so that we could move the aerobars into several different configurations without changing stems each time. This saved a tremendous amount of time once we got started. And at $850 an hour, time is expensive.

Once the bike was ready and being mounted in the tunnel by Dave’s assistants, Chris, Jim, Dave, the rider and I talked over the procedure we would use. Here is the process we had decided on earlier:


Step 1. Baseline. Conduct a base run using the fit as Chris had originally set it back in January. The first picture here shows that set up. This would serve as the standard by which we would judge all subsequent runs. Each would last one minute once everything was up to speed — wind and rider — but with bike adjustments and getting the tunnel ready each time wound up taking about 10 minutes per run. Chris worked quickly between runs to make the adjustments that follow.

Step 2. Front end height. Once we had a baseline we would begin to tinker with base handlebar and stem height. We would start by lowering the bars 1cm. If that produced a positive result (lower coefficient of drag) we would try 2cm lower. Any other changes in bar height would depend on what we found.

Step 3. Aerobar extension angle. Next we would tinker with the angle of the aerobars and arms in the extended position by increasing the angle 5, 10 and 15 degrees upward on subsequent runs. Later we decided to also try lowering the bars 4 degrees below the base position which was at zero degrees. At this point we also decided to rotate inward the arm extension bars at the grip end.

Step 4. Head position and helmet. Once the front end was optimally set we would experiment with head positions and helmets. Early on, however, we decided that his head position was quite good so didn’t mess around with this. He had brought another aero helmet with him but when he tried it on it was such a poor fit, sitting well up on top of his head, that we decided not to do a run with it. We had early on decided to tape over the vents in the helmet to see what benefits we might get from that based on an earlier recommendation from John Cobb. Since he competes mostly in 20k and 40k time trials this is unlikely to produce a problem. For 40k TTs in the heat he may not tape the vents.

Step 5. Miscellaneous. If we still had time (we had booked two hours) we would try anything that seemed reasonable based on what we had seen in previous runs. As it worked out we tried only one additional change – extending the handlebar reach by 1cm.

Notice that we didn’t intend to make any adjustments to the saddle position. This is what determines power output and we were convinced that Chris had fit this just right back in January when he had used the Retul device to originally set the bike.

The second picture here is the best position we came up with which reduced his coefficient of drag from the baseline run of 0.283 to 0.278 – a 1.8% improvement which translated into a 20-second savings in time in a 40k TT. That’s a small (and expensive!) gain which just goes to show what a great job Chris did in setting his bike initially. This was the second time Chris and I had set a bike and then visited the tunnel with one of the athletes I coach. The last time we shaved off 75 seconds, but most of this was head position and helmet. So Chris is pretty darned accurate at bike fitting when it comes to aerodynamics.

The final changes we adopted for this rider based on the wind tunnel results were:

1. Handlebars lowered 1cm. While at 2cm lower he had better numbers he also became obviously more unstable so this was not a good investment as it would likely reduce power and increase fatigue. His core strength needs to improve and once it does we can probably drop the front end a bit lower.


2. Bar extensions and arms angled 10 degrees up. At both 5 and 15 degrees his drag increased. But interestingly, at 10 degrees he had less drag. Lowering the bar extensions four degrees below the base also increased his drag.

3. Rotated extension grips inward. This lowered his time by about five seconds.

4. Helmet vents taped over. This took off about five more seconds.

Labels: